Discover the differences between bread machine vs oven-baked bread, including recipes, baking methods, tips, nutrition, and which option is best for you.
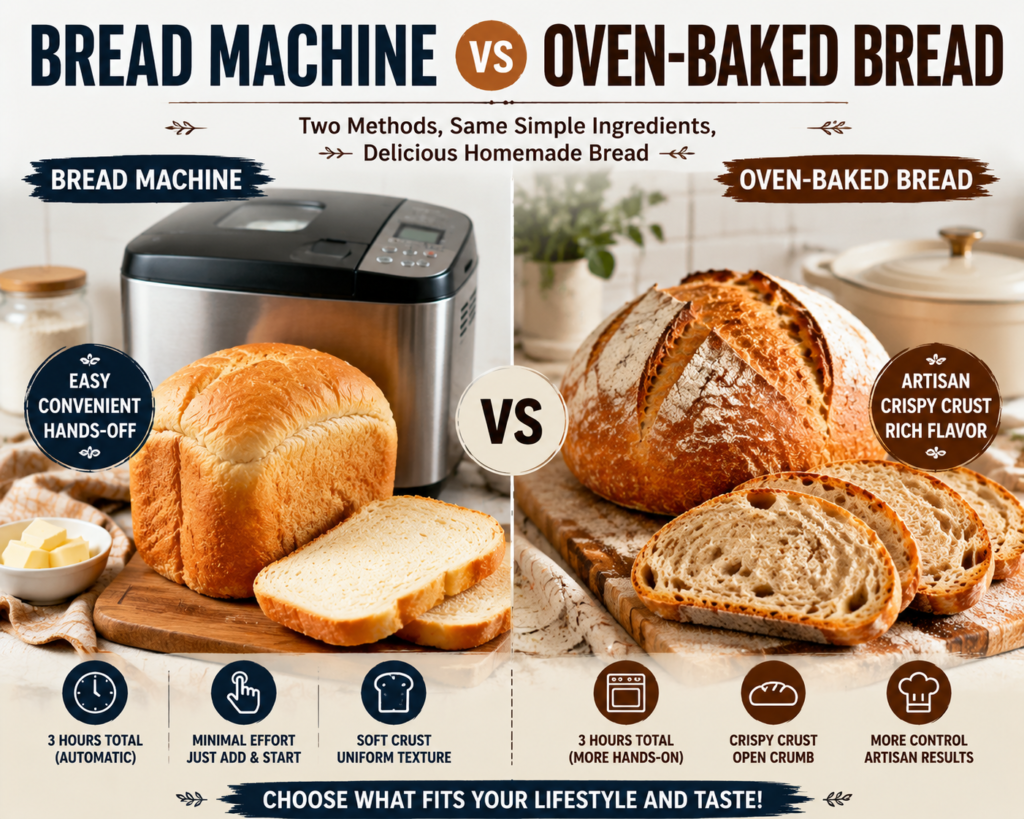
Bread Machine vs Oven-Baked Bread
If you’re trying to decide between bread machine vs oven-baked bread, you’re not alone. Many home bakers wonder which method produces the best loaf, saves the most time, and delivers the perfect texture. While both methods use nearly identical ingredients, the baking process, crust, crumb, flavour, and convenience are quite different.
A bread machine vs oven-baked bread comparison is especially helpful for beginners who want fresh homemade bread without unnecessary complications. Bread machines offer convenience by mixing, kneading, proofing, and baking automatically, while oven-baked bread provides greater control over shaping, crust development, and artisan-style results.
This guide compares bread machine vs oven-baked bread in detail while also providing complete recipes for both methods. Whether you’re baking breakfast toast, sandwich bread, dinner rolls, or artisan loaves, you’ll learn the advantages of each technique and discover which one best fits your lifestyle and baking goals.
Recipe Overview
| Item | Bread Machine Bread | Oven-Baked Bread |
|---|---|---|
| Prep Time | 10 minutes | 25 minutes |
| Rise Time | Automatic | 1½–2 hours |
| Cook Time | 3 hours (machine cycle) | 35 minutes |
| Total Time | About 3 hours | About 3 hours |
| Servings | 12 slices | 12 slices |
| Calories | 165 per slice | 170 per slice |
| Difficulty | Easy | Moderate |
Why You’ll Love This Bread Machine vs Oven-Baked Bread Guide
- Compare two popular homemade bread methods side by side.
- Learn which option is best for beginners and experienced bakers.
- Enjoy detailed recipes for both baking styles.
- Discover how each method affects texture, flavour, and crust.
- Save time by choosing the right baking technique.
- Perfect for sandwiches, toast, soups, and family meals.
- Includes expert baking tips for consistent success.
Ingredients
Bread Machine Bread
| Ingredient | Quantity | Purpose | Substitute |
|---|---|---|---|
| Bread flour | 500g | Strong gluten structure | All-purpose flour |
| Warm water | 320ml | Hydrates dough | Warm milk |
| Instant yeast | 7g | Helps dough rise | Bread machine yeast |
| Sugar | 1 tbsp | Feeds yeast | Honey |
| Salt | 10g | Enhances flavour | Sea salt |
| Butter | 30g | Soft texture | Olive oil |
Oven-Baked Bread
| Ingredient | Quantity | Purpose | Substitute |
|---|---|---|---|
| Bread flour | 500g | Main dough | All-purpose flour |
| Warm water | 330ml | Hydration | Milk |
| Instant yeast | 7g | Dough rise | Active dry yeast |
| Salt | 10g | Flavour | Kosher salt |
| Olive oil | 2 tbsp | Moisture | Melted butter |
| Honey | 1 tbsp | Light sweetness | Sugar |
Equipment Needed
For Bread Machine:
- Bread machine
- Measuring cups
- Measuring spoons
- Cooling rack
For Oven-Baked Bread:
- Large mixing bowl
- Kitchen scale
- Dough scraper
- Loaf pan or Dutch oven
- Baking tray
- Kitchen towel
- Cooling rack
- Sharp bread lame or knife
How to Make Bread Machine vs Oven-Baked Bread
Bread Machine Method
Step 1
Add the liquid ingredients to the bread machine pan according to the manufacturer’s instructions.
Step 2
Add the flour evenly over the liquids.
Step 3
Place the salt in one corner and the yeast in a separate corner so they do not touch immediately.
Step 4
Select the Basic White Bread programme and choose your preferred crust colour.
Step 5
Start the machine. It will automatically mix, knead, proof, and bake the bread.
Step 6
When the baking cycle finishes, carefully remove the loaf from the pan.
Step 7
Allow the bread to cool on a wire rack before slicing.
Oven-Baked Bread Method
Step 1
Mix warm water, honey, and yeast. Let it sit for 10 minutes until foamy.
Step 2
Add flour, salt, and olive oil to create a shaggy dough.
Step 3
Knead the dough for 8–10 minutes until smooth and elastic.
Step 4
Place the dough in a lightly oiled bowl, cover it, and let it rise until doubled in size.
Step 5
Punch down the dough and shape it into a loaf or artisan boule.
Step 6
Transfer the dough to a loaf tin or Dutch oven and allow it to rise again for about 40 minutes.
Step 7
Preheat the oven to 220°C.
Step 8
Score the top of the loaf using a sharp blade.
Step 9
Bake for 30–35 minutes until golden brown and the loaf sounds hollow when tapped.
Step 10
Cool completely before slicing for the best texture.
Bread Machine vs Oven-Baked Bread Comparison
| Feature | Bread Machine | Oven-Baked |
|---|---|---|
| Convenience | Excellent | Moderate |
| Crust | Softer | Crispier |
| Texture | Uniform | Artisan |
| Appearance | Standard loaf | Custom shapes |
| Hands-on Time | Very low | Moderate |
| Beginner Friendly | Excellent | Good |
| Flavour | Mild | Richer |
| Control | Limited | Full |
Expert Tips for Best Results
Whether you choose a bread machine vs oven-baked bread method, these expert tips will help you achieve a bakery-quality loaf every time.
- Measure ingredients accurately using a digital kitchen scale for consistent results.
- Use fresh yeast. Expired yeast can prevent the dough from rising properly.
- Keep your water between 38°C and 43°C. Water that is too hot can kill the yeast, while cold water slows fermentation.
- Choose high-protein bread flour for a lighter texture and better gluten development.
- Allow bread to cool completely before slicing to prevent a gummy interior.
- If baking in the oven, place a tray of hot water on the bottom rack to create steam and produce a crisp crust.
- Avoid adding too much extra flour during kneading, as this can make the loaf dry and dense.
- Check the dough during the first kneading cycle in a bread machine. If it’s too sticky or too dry, make small adjustments.
- For better flavour, let oven-baked dough rise slowly in the refrigerator overnight.
- Store homemade bread in a bread bag or cloth bag instead of plastic to maintain the best texture.
Common Mistakes to Avoid
Many baking problems are easy to prevent once you understand the common mistakes.
Using Expired Yeast
Old yeast loses its ability to produce carbon dioxide, resulting in flat, dense bread.
Incorrect Water Temperature
Water that is too hot kills the yeast, while cold water slows the rise dramatically.
Adding Too Much Flour
Many beginners add extra flour because the dough feels sticky. A slightly sticky dough usually creates a softer loaf.
Skipping the Second Rise
The second proof allows the dough to develop a lighter crumb and better oven spring.
Cutting Bread Too Early
Fresh bread continues cooking internally after it leaves the oven. Wait at least 30 minutes before slicing.
Opening the Oven Too Often
Frequent door opening releases heat and may cause the loaf to collapse.
Ignoring Bread Machine Instructions
Each bread machine has its own recommended ingredient order. Always follow the manufacturer’s instructions.
Recipe Variations
Healthy Version
Replace half of the white bread flour with whole wheat flour. Add chia seeds, flaxseeds, sunflower seeds, or oats for additional fibre and nutrients.
Gluten-Free Version
Use a high-quality gluten-free bread flour blend with xanthan gum. Select the gluten-free cycle if your bread machine has one.
Dairy-Free Version
Replace butter with olive oil or a dairy-free margarine. Use water or unsweetened oat milk instead of dairy milk.
Family-Friendly Version
Mix shredded cheddar cheese, herbs, garlic, raisins, cinnamon, or chocolate chips into the dough for fun and delicious flavour variations.
Storage Instructions
Room Temperature
Store bread in a cloth bread bag or airtight container for 2–3 days.
Refrigerator
Although refrigeration extends shelf life to about one week, it may dry the bread faster than room-temperature storage.
Freezer
Slice the bread before freezing. Wrap it tightly in plastic wrap or freezer-safe bags. Freeze for up to 3 months.
Reheating Instructions
- Toast slices directly from frozen.
- Warm an entire loaf in a 180°C oven for 10–15 minutes.
- Microwave individual slices for 10–15 seconds for quick serving.
- Sprinkle a little water on stale bread before reheating to restore moisture.
What to Serve With Bread Machine vs Oven-Baked Bread
Homemade bread pairs well with many meals.
- Creamy tomato soup
- Chicken noodle soup
- Beef stew
- Garlic butter
- Strawberry jam
- Peanut butter
- Scrambled eggs
- Avocado toast
- Cheese platter
- Olive oil and balsamic vinegar
- Chicken salad sandwiches
- Homemade pasta dishes
Nutritional Information
| Nutrient | Bread Machine Bread | Oven-Baked Bread |
|---|---|---|
| Calories | 165 | 170 |
| Protein | 5g | 6g |
| Carbohydrates | 31g | 33g |
| Fat | 3g | 2g |
| Fibre | 2g | 2g |
| Sugar | 2g | 2g |
| Sodium | 220mg | 230mg |
Values are approximate and may vary depending on ingredients used.
Read More About:Sourdough vs Yeast Bread Recipe: Key Differences & Best Recipes
Frequently Asked Questions
1. Is bread machine bread healthier than oven-baked bread?
Both are equally healthy when made with similar ingredients. The nutritional value depends more on the flour, fat, sugar, and added ingredients than on the baking method.
2. Which method is better for beginners?
Bread machines are generally easier because they automate mixing, kneading, proofing, and baking.
3. Why does oven-baked bread have a better crust?
Ovens allow higher baking temperatures and steam, creating a thicker, crispier crust than most bread machines.
4. Can I use bread machine dough in the oven?
Yes. Many bakers use the dough cycle on their bread machine, then shape and bake the loaf in the oven for an artisan finish.
5. Can I freeze homemade bread?
Absolutely. Slice the loaf first, wrap it well, and freeze for up to three months.
6. Why is my bread machine loaf dense?
Dense bread may result from expired yeast, incorrect ingredient measurements, or too much flour.
7. Which bread lasts longer?
Both breads stay fresh for about 2–3 days at room temperature. Freezing is the best option for long-term storage.
8. Can I make whole wheat bread in both methods?
Yes. Both bread machines and conventional ovens produce excellent whole wheat bread.
9. Why is my oven-baked bread dry?
Dry bread usually results from overbaking, too much flour, or insufficient hydration.
10. Which method produces better flavour?
Many bakers believe oven-baked bread develops a richer flavour because of greater control over fermentation and baking conditions.
Related Recipes
- Classic White Sandwich Bread
- Artisan Dutch Oven Bread
- Whole Wheat Honey Bread
- No-Knead Rustic Bread
- Soft Dinner Rolls
Final Thoughts
When comparing bread machine vs oven-baked bread, there is no single winner—it depends on your baking style and priorities. A bread machine is perfect if you value convenience, consistency, and minimal effort. On the other hand, oven-baked bread gives you greater control over shaping, crust development, and artisan-style texture.
Whether you’re a beginner looking for an easy everyday loaf or an experienced baker aiming for bakery-quality results, both methods can produce delicious homemade bread. Try each technique, experiment with different flours and flavours, and discover which one suits your kitchen and lifestyle best.
Recipe Card
<!DOCTYPE html>
<html lang="en">
<head>
<meta charset="UTF-8">
<title>Bread Machine vs Oven-Baked Bread Recipe Card</title>
<style>
body{
font-family:Arial,sans-serif;
background:#f6f2ea;
padding:30px;
}
.recipe-card{
max-width:800px;
margin:auto;
background:#ffffff;
border-radius:15px;
box-shadow:0 6px 18px rgba(0,0,0,.15);
padding:25px;
}
.recipe-card h2{
text-align:center;
color:#8B4513;
}
.info{
display:grid;
grid-template-columns:repeat(2,1fr);
gap:10px;
margin:20px 0;
}
.box{
background:#fff8ec;
padding:12px;
border-radius:8px;
text-align:center;
}
h3{
color:#8B4513;
margin-top:20px;
}
ul,ol{
padding-left:22px;
}
.notes{
background:#fff4cc;
padding:15px;
border-left:5px solid #d49a00;
margin-top:20px;
border-radius:6px;
}
</style>
</head>
<body>

<div class="recipe-card">

<h2>🍞 Bread Machine vs Oven-Baked Bread</h2>

<div class="info">
<div class="box"><strong>Prep Time</strong><br>10–25 mins</div>
<div class="box"><strong>Cook Time</strong><br>35 mins / Machine Cycle</div>
<div class="box"><strong>Total Time</strong><br>About 3 Hours</div>
<div class="box"><strong>Servings</strong><br>12 Slices</div>
<div class="box"><strong>Calories</strong><br>165–170 Per Slice</div>
<div class="box"><strong>Difficulty</strong><br>Easy–Moderate</div>
</div>

<h3>Ingredients</h3>

<ul>
<li>500g Bread Flour</li>
<li>320–330ml Warm Water</li>
<li>7g Instant Yeast</li>
<li>10g Salt</li>
<li>1 tbsp Honey or Sugar</li>
<li>2 tbsp Olive Oil or 30g Butter</li>
</ul>

<h3>Instructions</h3>

<ol>
<li>Measure all ingredients accurately.</li>
<li>Mix or add ingredients to the bread machine.</li>
<li>Knead until smooth.</li>
<li>Allow the dough to rise.</li>
<li>Shape the loaf if baking in the oven.</li>
<li>Bake until golden brown.</li>
<li>Cool completely before slicing.</li>
</ol>

<div class="notes">
<strong>Notes:</strong>
For maximum convenience, use a bread machine's automatic cycle. For a crisp artisan crust and custom loaf shapes, bake in a preheated oven. Both methods produce delicious homemade bread when measurements are accurate.
</div>

</div>

</body>
</html>